By Glenn Goodspeed (May, 1999)
Front end alignment is difficult for the home mechanic. Aligning the front wheels requires precise measuring tools and an understanding of the causes and effects of making adjustments. On the other hand, taking an old car to an alignment shop can be a frustrating experience if the technician is not familiar with its idiosyncracies. To make sure alignment is done right, it is helpful to learn the basics of how and why wheels are aligned.
Most cars allow adjustment of at least three front wheel angles: caster, camber and toe-in. Two other angles, steering axis inclination and toe-out, are not individually adjustable on the P1800.
It is possible to adjust the three angles, but why would you want to? In a word, "handling." Front suspension and steering are designed to work best when the wheels are in correct alignment. Even small variations can make driving tiresome and unpredictable.
Due to manufacturing and installation tolerances, alignment is necessary whenever suspension parts are replaced. Even rear suspension parts may have an effect on front end geometry, especially new springs and shock absorbers that raise or lower the rear end.
If the car's handling is affected by slight damage or suspension wear, it may be more practical to adjust the front end than to repair the damage or replace parts that are still useful. Since precision is required for correct alignment, it only takes a little wear in bushings and balljoints to make an alignment necessary.
Some drivers want to try different alignment settings to boost performance under specific conditions or to compensate for suspension modifications. It is especially important for them to know how the various angles affect steering and handling, as well as the effects on the safety and longevity of the suspension.
For most people, it is best to stay within the limits specified by Volvo. Settings beyond the limits can cause unexpected handling characteristics and premature suspension wear. Such settings are used sometimes for special purposes, as in racing, but usually with the understanding that suspension parts will be inspected and replaced frequently.
All three of the angles explained here work together. Any change to one will change the overall effect of the others. Caster and camber may be used to make the car pull to one side or the other, usually to counteract such forces introduced by wear, damage, or prevalent road conditions. For instance, some experts recommend setting up the suspension with a small amount of bias to counteract the outward pull induced by high-crowned roads.
Toe-in is adjusted to keep the wheels parallel to the length of the car when the car is traveling in a straight line, and it does not affect directional bias when properly adjusted. Toe-in on the P1800 is specified between zero and minus 5/32 of an inch, meaning that the front wheels should be slightly "pigeon-toed" when the adjustment is completed.
Ideally, both wheels should always be pointed straight ahead when the car is traveling in a straight line, but road conditions and suspension tolerances make the toe vary. Since it is impossible to keep it perfectly at zero at all times, toe is set slightly negative. This helps keep the wheels from changing from toe-in to toe-out (splayed) on a straight road, which would make the car weave.
The steering linkage is laid out so that when the wheels are not pointed straight ahead, some toe-out is introduced. Since the inner wheel travels a smaller circle than the outer wheel in a turn, it needs to be turned a little sharper, resulting in toe-out relative to the outer wheel. This arrangement of the linkage is called an Ackerman layout, and it is not adjustable on the P1800. The measurement is often called simply "toe-out," and is measured with the steering at full lock. Any variation from the factory setting indicates worn or bent steering parts.
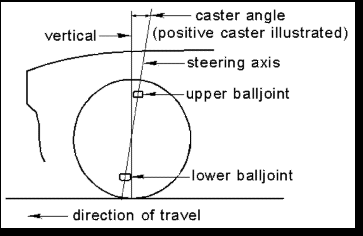
Caster is the angle between a vertical* line and the steering axis viewed from the side of the car. The steering axis can be visualized as a line drawn through the balljoints. If the steering axis is tilted back, so that the lower balljoint is slightly ahead of the upper balljoint, the caster is positive. If the axis is tilted forward, the caster is negative. Positive caster helps keep the front wheels pointed straight ahead (think of riding a bike with no hands), and it makes the wheels return to center after a turn.
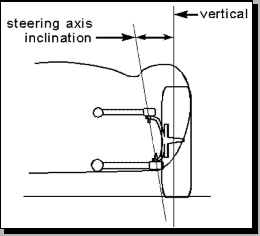
Some cars are designed with negative caster. At first glance, this seems odd, because a negative-castered wheel always tries to turn itself around, making negative caster very unstable. But cars designed with negative caster also have enough steering axis inclination to overpower this effect. Steering axis inclination is the angle of the steering axis from vertical viewed from the front of the car.
It is difficult to see alignment angles on most cars, because they are so slight. On the P1800, the stock caster specification is only one degree maximum. To really see caster, look at a bicycle. Most bikes have a positive caster setting of more than fifteen degrees -- you can tell by the way the front fork juts out. The steering axis is easy to see if you look at the short tube that holds the top end of the fork. If you dropped a plumb line down next to the tube, you could measure the caster roughly with a classroom protractor.
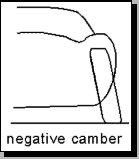
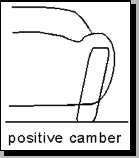
Camber is the angle between a vertical line and the centerline of a wheel viewed from the front of the car. The Volvo uses positive camber, which means the wheel is closer to the center of the car at the bottom than at the top. Ideally, camber should always be zero, because this puts as much tire tread on the road as possible. As with toe-in, the ideal is not possible at all times, and the best compromise for road use is a slightly positive setting.
When a wheel has positive caster, positive camber will make the wheel steer away from the car, while negative camber will make it steer toward the car. One way to see how these forces work is to hold a furniture caster by the stem and roll it around on a desk. By tilting the caster sideways to give it camber, you can see which way the wheel will turn. Note that the directional forces of camber are reversed if caster is negative.
Because of the directional bias of camber and caster, excessive settings can make the car jumpy on a rough road. Camber and caster preload the suspension, so when one wheel loses traction because of a bump, the other wheel yanks the car in the direction dictated by its camber. When the front end is set within specs, these effects are minimal.
On race cars, camber is often set negative to compensate for increased positive camber caused by unusually high cornering stresses. Racing devotees are willing to put up with added steering effort and suspension wear to gain cornering adhesion. Racers may conduct static tests with the springs removed to determine how much positive camber is added by body roll and thus how much negative camber to apply. Even in racing, some compromises must be made. Excessive camber increases drag and wear on the tires and reduces braking power.
This section is aimed at do-it-yourselfers, but it contains information that might be valuable for any other P1800 owner to pass on to an alignment technician.
Before doing any measurements or adjustments, check all the steering and suspension parts for damage and wear and replace parts as necessary. It is impossible to align wheel angles to a precision of 1/8 of a degree if you have two degrees of slop in the suspension.
The three front wheel angles are adjusted in order: caster, camber and finally toe. The caster and camber angles are adjusted by adding and removing shims. To adjust caster equally on both wheels at once, the entire front crossmember may be rotated slightly. Shims for this adjustment may be found under the mounting ears on the front of the crossmember where it is bolted up to the frame. Camber adjusting shims may be found behind the "dog bone" pivots that fasten the upper A-frames to the crossmember. These shims are also used to adjust caster on individual wheels. Toe is adjusted by lengthening or shortening the center tie rod.
Before making any adjustments, you'll have to measure the existing angles. If you own a shop with an alignment rack, great! Otherwise, you'll need to purchase an alignment gauge. There are several small, portable gauges that measure caster and camber. Choose one that is accurate to within 1/8 of a degree. Whether you have an alignment rack or a hand-held gauge, you must follow the instructions carefully to make meaningful measurements.
Most gauges require the front wheels to be turned in and out about 20 degrees in either direction when taking caster measurements. Some gauges are designed to make it easy to eyeball the necessary turning angles, but you might need to mark the angles on the floor. Commercial shops use graduated turntables under the front wheels for this purpose, but these are quite a bit more expensive than chalk and a protractor. To make the wheels easier to turn, place a square of sheet metal under each one.
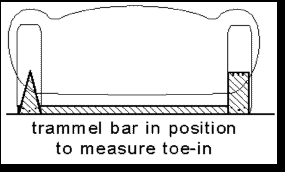
You'll need a toe gauge capable of comparing the distance between the wheels at the front and the rear of the tires. It is not hard to make one of these yourself if you're on a limited budget. A piece of 2x2 lumber as long as the width of the car with two pieces of plywood securely screwed to it will work (this is called a trammel bar). Also, you should have some extra shims available. The most useful thicknesses are .5, 1 and 3 mm.
The car must be on a flat, level surface to take accurate measurements. If there is any doubt that the surface is level, use a carpenter's level to test it. Any variation in the car's stance after you are finished aligning the front end will change the angles you set, so make sure the car is loaded as it will be when you are driving. In particular, make sure there are no heavy items in the trunk unless you plan to leave them there after the wheels are aligned.
Adjustments can be estimated by consulting the shim chart, but you may still have to do some trial-and-error work before you are finished. This is why you must keep a record of every measurement, starting with the initial settings. It only takes a few seconds to write down your settings, and doing so can literally save hours of trial-and-error work.
![]()
Caster is adjusted first by rotating the crossmember. This is a rough adjustment, after which each wheel may be adjusted individually by adding or removing shims at the upper A-frames.
If the initial caster measurement is outside the specified range on both wheels, determine whether it is off in the same direction before trying to adjust the crossmember. Rotating the crossmember adjusts both sides at once, so if the caster is o.k. on one side of the car, you might want to skip the crossmember adjustment. To see how much change in caster you can expect from a given shim thickness, consult the shim chart. Adding shims reduces caster; removing them increases it. Make sure the total shim thickness on the left side is identical to that on the right side. If they are different, the crossmember will be twisted.
Before adjusting, loosen the four bolts that secure the rear of the crossmember to the body. Since two of these bolts run close to the starter solenoid, disconnecting the battery first will avoid the possibility of sparks. Then loosen the front crossmember bolts that clamp the shims between the crossmember and the frame. You might need to pry the crossmember away from the frame with a stout screwdriver to add or remove shims. Remember to tighten all the securing bolts (making sure the shims remain in position) before re-measuring the caster.
Now that the caster is "roughed in," take measurements again on both sides to be sure your results are what you expected. At this point, you should be ready to fine-tune the caster at the upper A-frame bolts. Again using the chart, determine what shim thicknesses to add or remove. Adding shims to the forward A-frame securing bolt will decrease caster. Adding shims to the rear bolt will increase it. Removing shims from either produces the opposite effect. Tighten the bolts to 35 ft.-lbs. before re-measuring.
Don't worry about getting the caster exactly the same on both sides. In theory, you should not have more than a 1/2-degree difference between the two sides, but in practice, you might need to re-adjust one side or the other to compensate for handling characteristics after you test-drive the car.
Camber on each wheel is adjusted by adding or removing equal thicknesses of shims from both A-frame bolts at the wheel being adjusted. Adding shims decreases camber; removing shims increases it. Tighten the bolts to 35 ft.-lbs. before re-measuring.
Toe-in is adjusted last, because any change in caster or camber will change the toe setting. To measure toe, first measure the distance between the left and right tires at their leading edges. Then measure the distance between their trailing edges. Both measurements should be at the height of the axle. The front measurement should be smaller by about 1/8 of an inch. To adjust, hold the center steering rod with a pipe wrench and loosen the jam nuts at either end. Note that one has left-hand thread, so you'll be turning both nuts the same direction to loosen them. Turn the steering rod to lengthen or shorten the distance between the leading edges of the wheels.
Toe adjustment can be estimated by counting threads on one of the tie rod ends before twisting the center rod. Figure one thread will change the toe about 1/8 of an inch. Tighten the jam nuts before making the final measurements. Also, if you are not using turntables under the front wheels, you must roll the car back and forth a few feet to allow the suspension to settle into its normal attitude before you re-measure.
When you have finished setting the toe-in, take the car for a test drive. If it pulls to one side or the other, consult your settings and the possible remedies to determine the best course of action. For instance, say the car pulls to the right. If all your settings are within specs, your options are to reduce right caster, increase left caster, reduce right camber and/or increase left camber. If some of your settings are close to the limits, you'll need to adjust other settings first.
If your results don't make sense, something's wrong. I'll never forget the time I kept decreasing right camber expecting the car to stop pulling to the right, and it kept pulling worse. When I finally got around to rechecking the caster, I found I had accidentally set it negative instead of positive. If you're absolutely sure your settings are correct and the handling still is not right, you should check again for bent or worn suspension parts.
Another possible reason for inaccurate camber settings is that the floor might not be level. If this is the case, you can measure the angle between the floor and horizontal (in the direction across the car) using a long straightedge, a carpenter's square and your camber gauge. Then to correct your camber readings, add or subtract the floor angle as follows: If the car is tilted down on the left, subtract the floor angle from the left wheel camber and add it to the right wheel camber. If the car is tilted down on the right, subtract from the right and add to the left. Another way to deal with this is to use shims under the wheels to level the car.
*For purposes of this discussion, "vertical" assumes the car is on a flat, level surface.
|
Chassis number |
Caster |
Camber |
Toe-In |
|
0-2610 |
0 ± 1/2º |
0 to +1/2º |
0 to -5/32" |
|
2611-up |
0 to +1º |
0 to +1/2º |
0 to -5/32" |
Auto Mechanics
, by Herbert E. Ellinger, Prentice-Hall, Inc., 1972.How to Make Your Car Handle
, by Fred Puhn. H.P. Books, 1976.Volvo Service Repair Handbook 122 Series and P1800 All Years
, Clymer Publications, 1972.